
On this subject we will learn how to create buttons and interact with them.
1. UI & Hints
In this section we will cover the basics of creating buttons and showing hints on the Vive Controller.
– Create an empty object in which you will store your buttons.
– Right-click on it -> Create -> UI -> Button
– In the Inspector, expand the Rect Transform and type in some better values for the size, i.e. Width: 0.4, Height: 0.08
– Expand Image, and choose Source Image -> None. (you can go ahead and play with this feature if you want to create more complex buttons).
– If you expand the Button (Script) section, you can pay with the different colors the button will have when you Hover/Press/Disable it. You can also play with the transition if you want to have images/animations.

– In the Hierarchy, expand the Button, and click on the Text object.
– In the Inspector, if you expand the Text (Script) section, you can play with the Style of the text. NOTE, you might need to change the Width/Height and Scale from the Rect Transform in order to see the text properly.

– From Assets/SteamVR/InteractionSystem/Core/Scripts pick the UIElement script and drag and drop it on the Button_Test object.
– In the Assets/Scripts folder create a new Script – Name it ButtonHints.
– Add the following code:
using System.Collections;
using System.Collections.Generic;
using UnityEngine;
using Valve.VR.InteractionSystem;
using Valve.VR;
public class ButtonHints : MonoBehaviour
{
private Coroutine buttonHintCoroutine;
private Coroutine textHintCoroutine;
public void ShowButtonHints( Hand hand )
{
if ( buttonHintCoroutine != null )
{
StopCoroutine( buttonHintCoroutine );
}
buttonHintCoroutine = StartCoroutine( TestButtonHints( hand ) );
}
//————————————————-
// Cycles through all the button hints on the controller
//————————————————-
private IEnumerator TestButtonHints( Hand hand )
{
ControllerButtonHints.HideAllButtonHints( hand );
while ( true )
{
ControllerButtonHints.ShowButtonHint( hand, EVRButtonId.k_EButton_ApplicationMenu );
yield return new WaitForSeconds( 1.0f );
ControllerButtonHints.ShowButtonHint( hand, EVRButtonId.k_EButton_System );
yield return new WaitForSeconds( 1.0f );
ControllerButtonHints.ShowButtonHint( hand, EVRButtonId.k_EButton_Grip );
yield return new WaitForSeconds( 1.0f );
ControllerButtonHints.ShowButtonHint( hand, EVRButtonId.k_EButton_SteamVR_Trigger );
yield return new WaitForSeconds( 1.0f );
ControllerButtonHints.ShowButtonHint( hand, EVRButtonId.k_EButton_SteamVR_Touchpad );
yield return new WaitForSeconds( 1.0f );
ControllerButtonHints.HideAllButtonHints( hand );
yield return new WaitForSeconds( 1.0f );
}
}
}
– Now add this script to an object. You can either add it to the button, or create a common empty object. I will go with the latter option.
– Back to your object, expand the UI Element(Script) section, and scroll down to the events – you should have the On Click (Hand) event there.
– Press the + button, select the Editor and Runtime option
– Drag the empty object below, and from the function option select ButtonHints-> ShowButtonHints – the one above, without a parameter. It should pick the hand Dynamicaly
– The last thing we want to do here is add a collider for the button. It can either be on the button object, or as a child object. I will go with the second option, create a cube under the button object and disable the mesh renderer so it doesn’t show up. I will use only the collider from it.

DONE! This can be tested. Now let’s learn how to create TextHints.
– Repeat the first steps if you want to create a new button. I will use the same Text01 for now.
– Create a new script, name it TextHints and open it.
– Enter the following code:
using System.Collections;
using System.Collections.Generic;
using UnityEngine;
using Valve.VR.InteractionSystem;
using Valve.VR;
public class TextHints : MonoBehaviour
{
private Coroutine buttonHintCoroutine;
private Coroutine textHintCoroutine;
//————————————————-
public void ShowTextHints( Hand hand )
{
if ( textHintCoroutine != null )
{
StopCoroutine( textHintCoroutine );
}
textHintCoroutine = StartCoroutine( TestTextHints( hand ) );
}
//————————————————-
// Cycles through all the text hints on the controller
//————————————————-
private IEnumerator TestTextHints( Hand hand )
{
ControllerButtonHints.HideAllTextHints( hand );
while ( true )
{
ControllerButtonHints.ShowTextHint( hand, EVRButtonId.k_EButton_ApplicationMenu, “Application” );
yield return new WaitForSeconds( 3.0f );
ControllerButtonHints.ShowTextHint( hand, EVRButtonId.k_EButton_System, “System” );
yield return new WaitForSeconds( 3.0f );
ControllerButtonHints.ShowTextHint( hand, EVRButtonId.k_EButton_Grip, “Grip” );
yield return new WaitForSeconds( 3.0f );
ControllerButtonHints.ShowTextHint( hand, EVRButtonId.k_EButton_SteamVR_Trigger, “Trigger” );
yield return new WaitForSeconds( 3.0f );
ControllerButtonHints.ShowTextHint( hand, EVRButtonId.k_EButton_SteamVR_Touchpad, “Touchpad” );
yield return new WaitForSeconds( 3.0f );
ControllerButtonHints.HideAllTextHints( hand );
yield return new WaitForSeconds( 3.0f );
}
}
}
– Save, add it to the empty object, and call it from the UI Element section, like we did above.
– DONE, now if you click the button you will see the text hints appearing on your Vive Controller. Now let’s see how we can disable them.
– Create a new button to disable the hints.
– Add the following code to both the ButtonHints.cs and TextHints.cs scripts:
public void DisableHints()
{
if ( buttonHintCoroutine != null )
{
StopCoroutine( buttonHintCoroutine );
buttonHintCoroutine = null;
}
if ( textHintCoroutine != null )
{
StopCoroutine( textHintCoroutine );
textHintCoroutine = null;
}
foreach ( Hand hand in Player.instance.hands )
{
ControllerButtonHints.HideAllButtonHints( hand );
ControllerButtonHints.HideAllTextHints( hand );
}
}
– Done, grab whatever Hint you want to disable (Text or Button) and add it to the button.
– This time, instead of adding it to the UI Element section, we will add it to the Button(script) – On Click() section. Why? Because we don’t need the Hand element passed as a parameter.

PS. I guess you already figured this out, but the script we wrote today should be in the same file, for it to work properly. Meaning, the Text coroutine will be stopped when the Button one starts. I made two different files so we you can follow the tutorial easier.
2. Throwable objects
– Create an empty object, name it ThrowableSomething.
– As a child, add a cube or a sphere (Create -> 3D Object)
– From Assets/SteamVR/InteractionSystem/Core/Scripts, add the following scripts to the ThrowableSomething:
a. VelocityEstimator
b. Interactable
c. Throwable
d. Interactable Hover Events
– Each of these properties can be configurable, but for now we need to configure just the Interactable Hover Events property.
– For the On Hand Hover Begin() and On Hand Hover End() methods, choose Runtime Only, as an object add the Cube inside ThrowableSomething, and as a function choose MeshRenderer.material.
– For Begin() select ShinyWhiteHighlighted, for End choose ShinyWhite
– Last thing you need to do is add a Rigidbody to ThrowableSomething and check the Use Gravity checkbox.

TIPS & TRICKS
a. You can create your own throwable script, to make your life easier.
Just create a new script and add the following:
using System.Collections;
using System.Collections.Generic;
using UnityEngine;
using Valve.VR.InteractionSystem;
[RequireComponent( typeof( Interactable ) )]
[RequireComponent( typeof( Rigidbody ) )]
[RequireComponent( typeof( VelocityEstimator ) )]
[RequireComponent( typeof( InteractableHoverEvents ) )]
[RequireComponent( typeof( Throwable ) )]
public class ThrowableObjectScript : MonoBehaviour
{
}
DONE! Just drop this on the Empty Object and the other scripts will be included automatically.
You will just need to configure the OnHover events.
b. To make the spehere (or other objects) bouncy, you just need to download and import in your projects the following Physic material:
Click the Spehere, and in the Sphere Collier section, material, select the Bouncy material.
DONE!
3. Button Interactable/Attach/Detach objects
On this section, we will learn how to handle different button events on the object. Also, we will learn how to attach/detach an object to the hand (controller)
– Create an empty object. Name it: InteractableTest. Inside it, create a Sphere or cube and a text object.
– Create a script and name it InteractableTestScript.cs with the following code.
using UnityEngine;
using System.Collections;
using Valve.VR.InteractionSystem;
[RequireComponent( typeof( Interactable ) )]
public class InteractableTestScript : MonoBehaviour
{
private TextMesh textMesh;
private Vector3 oldPosition;
private Quaternion oldRotation;
private float attachTime;
private string lastButtonPressed = “”;
private Hand.AttachmentFlags attachmentFlags = Hand.defaultAttachmentFlags & ( ~Hand.AttachmentFlags.SnapOnAttach ) & ( ~Hand.AttachmentFlags.DetachOthers );
//————————————————-
void Awake()
{
textMesh = GetComponentInChildren();
textMesh.text = “No Hand Hovering”+ “\n Last button pressed: ” + lastButtonPressed;
}
//————————————————-
// Called when a Hand starts hovering over this object
//————————————————-
private void OnHandHoverBegin( Hand hand )
{
textMesh.text = “Hovering hand: ” + hand.name + “\n Last button pressed: ” + lastButtonPressed;
}
//————————————————-
// Called when a Hand stops hovering over this object
//————————————————-
private void OnHandHoverEnd( Hand hand )
{
textMesh.text = “No Hand Hovering”+ “\n Last button pressed: ” + lastButtonPressed;
}
//————————————————-
// Called every Update() while a Hand is hovering over this object
//————————————————-
private void HandHoverUpdate( Hand hand )
{
if ( hand.GetStandardInteractionButtonDown() || ( ( hand.controller != null ) && hand.controller.GetPressDown( Valve.VR.EVRButtonId.k_EButton_Grip ) ) )
{
if ( hand.currentAttachedObject != gameObject )
{
// Save our position/rotation so that we can restore it when we detach
oldPosition = transform.position;
oldRotation = transform.rotation;
// Call this to continue receiving HandHoverUpdate messages,
// and prevent the hand from hovering over anything else
hand.HoverLock( GetComponent() );
// Attach this object to the hand
hand.AttachObject( gameObject, attachmentFlags );
}
else
{
// Detach this object from the hand
hand.DetachObject( gameObject );
// Call this to undo HoverLock
hand.HoverUnlock( GetComponent() );
// Restore position/rotation
transform.position = oldPosition;
transform.rotation = oldRotation;
}
}
if (hand.controller != null)
{
if (hand.controller.GetPressDown (Valve.VR.EVRButtonId.k_EButton_SteamVR_Trigger)) {
lastButtonPressed = “Trigger”;
}
if (hand.controller.GetPressDown (Valve.VR.EVRButtonId.k_EButton_SteamVR_Touchpad)) {
lastButtonPressed = “Touchpad”;
}
if (hand.controller.GetPressDown (Valve.VR.EVRButtonId.k_EButton_Grip)) {
lastButtonPressed = “Grip”;
}
if (hand.controller.GetPressDown (Valve.VR.EVRButtonId.k_EButton_System)) {
lastButtonPressed = “System”;
}
if (hand.controller.GetPressDown (Valve.VR.EVRButtonId.k_EButton_ApplicationMenu)) {
lastButtonPressed = “ApplicationMenu”;
}
}
}
//————————————————-
// Called when this GameObject becomes attached to the hand
//————————————————-
private void OnAttachedToHand( Hand hand )
{
textMesh.text = “Attached to hand: ” + hand.name;
attachTime = Time.time;
}
//————————————————-
// Called when this GameObject is detached from the hand
//————————————————-
private void OnDetachedFromHand( Hand hand )
{
textMesh.text = “Detached from hand: ” + hand.name;
}
//————————————————-
// Called every Update() while this GameObject is attached to the hand
//————————————————-
private void HandAttachedUpdate( Hand hand )
{
textMesh.text = “Attached to hand: ” + hand.name + “\nAttached time: ” + ( Time.time – attachTime ).ToString( “F2” );
}
//————————————————-
// Called when this attached GameObject becomes the primary attached object
//————————————————-
private void OnHandFocusAcquired( Hand hand )
{
}
//————————————————-
// Called when another attached GameObject becomes the primary attached object
//————————————————-
private void OnHandFocusLost( Hand hand )
{
}
}
Now drag this script to the empty object (InteractableText) and you are done! It is ready to be tested.
4. Linear Drive
This one is a bit tricky, but it will have a cool result, so stick with me.
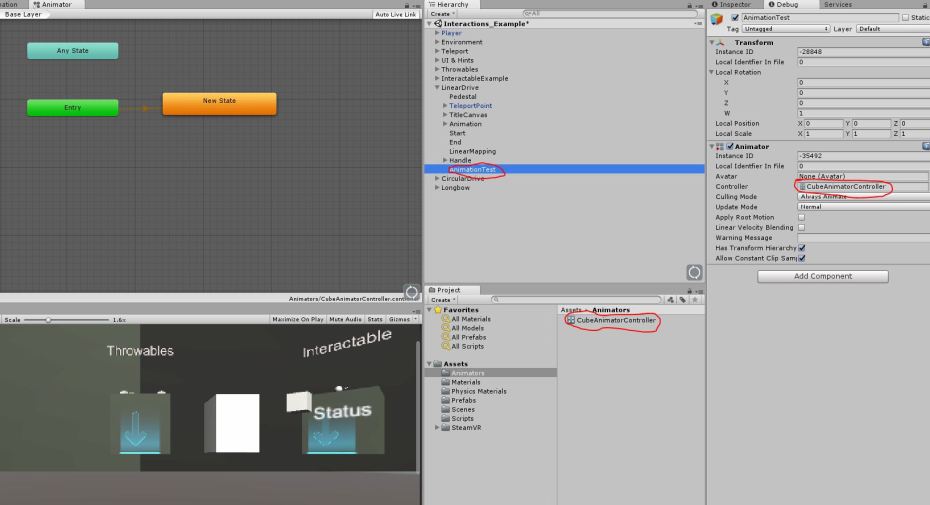
– Create an empty object and name it AnimationTest
– In the Inspector, click Add Component and Choose Animator
– In the Assets folder create a folder name Animators.
– In it, right-click -> Create -> Animator Controller. Name it CubeAnimatorController
– Double-Click it, right click in the animator window, Create State -> Empty
– Now drag the CubeAnimatorController to the AnimationTest->Animator->Controller section.
– Create a new folder in the Assets and name it “Animations”.
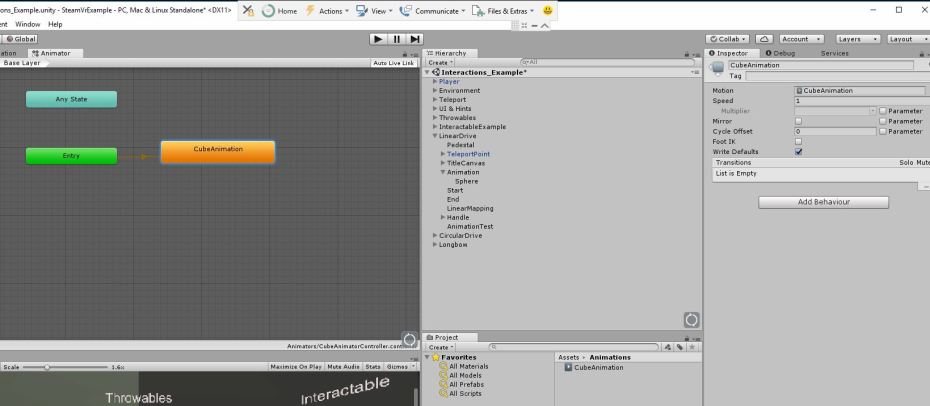
– In it, right-click -> Create -> Animation – name it CubeAnimation.
– Now go back to the Animator Window, click the New State, drag this CubeAnimation in the Inspector -> Motion section, and change the name of the state to CubeAnimation.
– Now right-click AnimationTest, Create -> 3D -> Cube
– Make it smaller, maybe change the color.
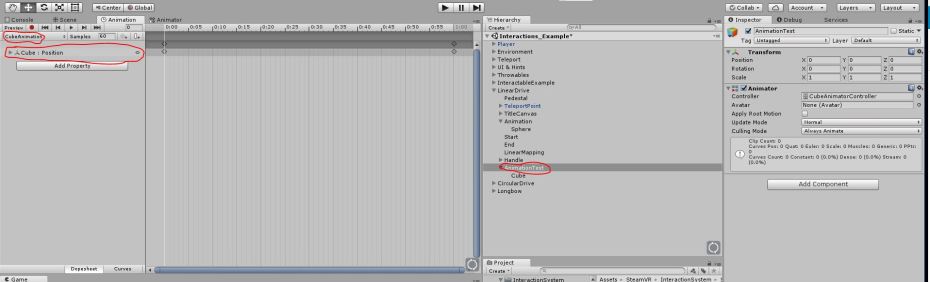
– Select AnimationTest, and open the Animation Window.
– Make sure the CubeAnimation is selected in the upper left side of the window.
– Click Add Property -> Cube -> Position
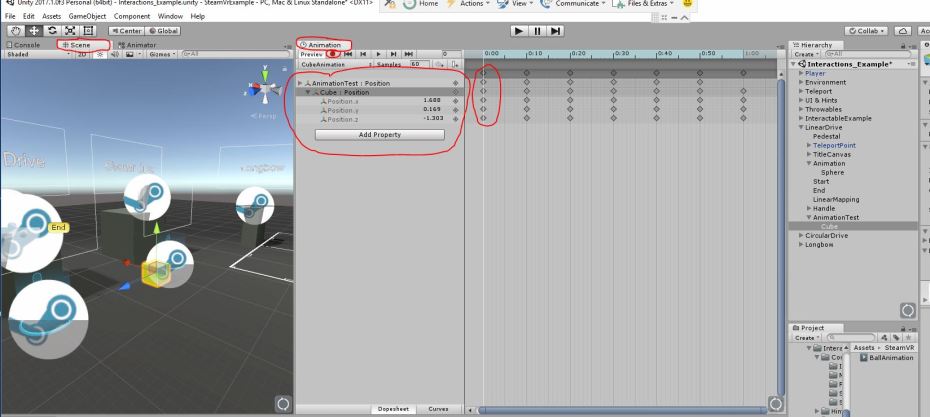
-Create an animation for the cube – movement.
– To do that, in the Animation Window, click the Record button, in the timeline, right-click a frame -> add Key Frame
– As a note, the next part will be easier if you split the Scene/Animation tabs in 2 separate windows.
– Now, while on the Key Frame, move the Cube in the scene to a new position. Keep doing that. If you move the timeline line, you will see your cube moving on the trajectory you choose. (you can do that with the other cube properties as well.
– Make sure the Animator section is enabled in the Inspector
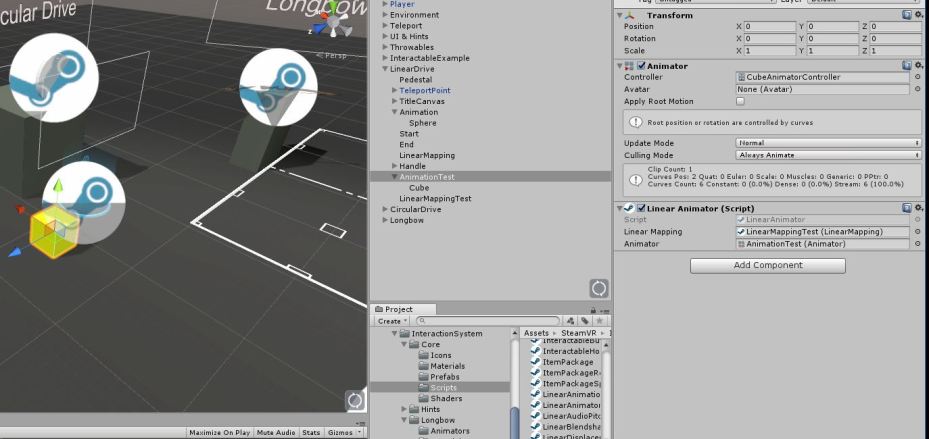
– From Assets/SteamVR/InteractionSystem/Core/Scripts select the Linear Animator script and drag it on the AnimationTest
– Create a new empty object and name it LinearMappingTest
– From Assets/SteamVR/InteractionSystem/Core/Scripts select LinearMapping script sand drag it on the newly created object. Make Sure the value is 0.
– Back to the AnimationTest, Linear Animator (script) section, drag and drop LinearMappingTest in the Linear Mapping parameter, and the AnimationTest in the Animator parameter.
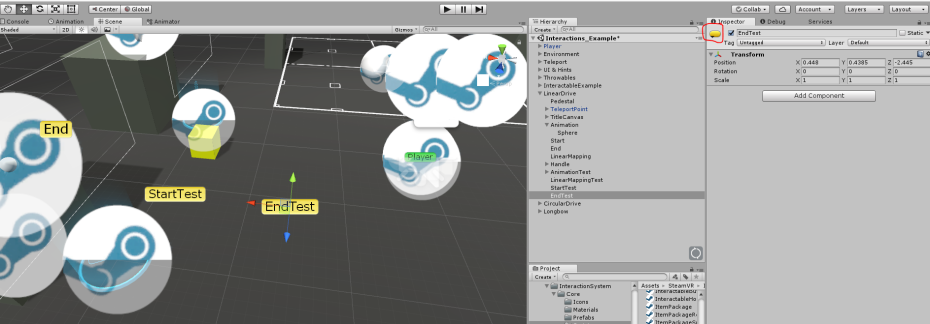
– Now, create 2 Empty Objects : StartTest and EndTest. Put them one on the left and one on the right sort to say. You can change the colors from the uppers left corner of the Inspector tab if you wish.
– The last part is for creating a handle for the animation. Create an empty project and name it HandleTest.
– From Assets/SteamVR/InteractionSystem/Core/Scripts drag and drop the Intractable Hover Events (Script)
– Inside HandleTest add a 3D Sphere. Place it between StartTest and EndTest.
– For the Intractable Hover Events section, create On Hand Hover Begin() and On Hand Hover End() events as we learned above, by using the Sphere Mesh Renderer.
-Create a Rigidbody with Use Gravity OFF and Is Kinematic ON for HandleTest.

– From Assets/SteamVR/InteractionSystem/Core/Scripts drag and drop LinearDrive (script) and HapticRack (script).
– In the LinearDrive section set:
– Start Position -> StartTest
– End Position -> EndTest
– Linear Mapping -> LinerMappingTest
– Reposition Game Object and Maintain Momentum – checked
– Momentum Dampen Rate 5
– In the HapticRack section, set the Linear Mapping to LinearMappingTest
– Done! This is ready to be tested. Go and move the sphere to see what happens.
5. Circular Drive
– Now we learned about the linear drive, now let’s try to create a circular one.
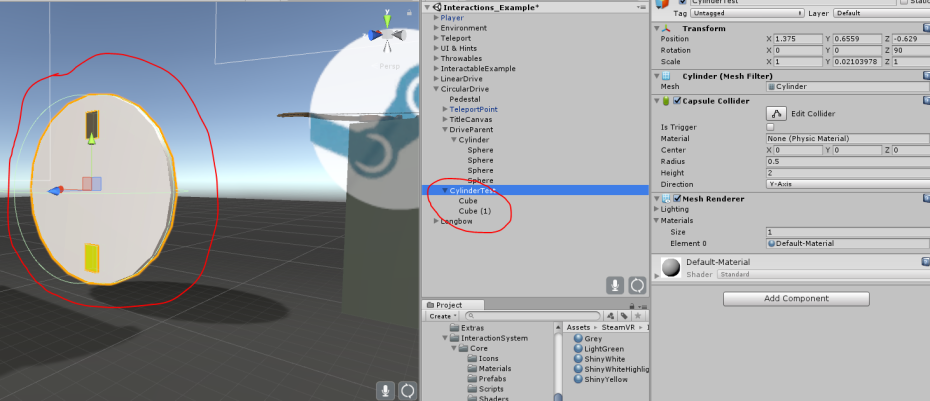
– Right-Click -> Create -> 3D -> Cylinder. Name it CylinderTest
– Make it smaller, rotate it, so it looks like a wheel. Inside it, create 2 objects (cube/spheres). This is just to see that the wheel is rotating.
– From Assets/SteamVR/InteractionSystem/Core/Scripts drag and drop the following on the CylinderTest:
– Interactable Hover Events
– CircularDrive
– The Interactable script should be added by default.
– For the Interactable Hover Events script, configure it as above.
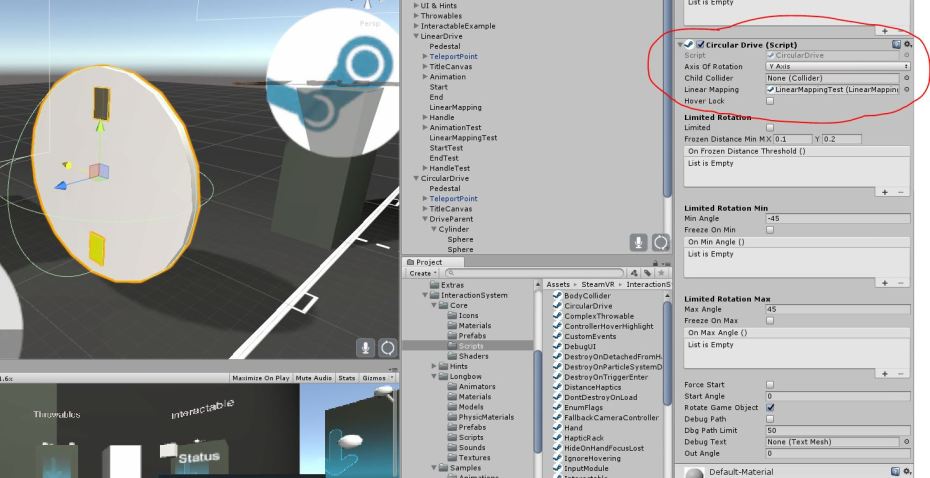
– TEST! You will probably notice that the object does not quite rotate as you want. You will need to play a bit with the object. DON’T FORGET TO CHECK THE Circular Drive (Script) section – Axis Of Rotation – play with that as well.
– Now, for the ultimate test, drag and drop the LinearMappingTest from the previous point to Circular Drive (Script) -> Linear Mapping and test. See what happens.
5. Longbow
– On this topic, we will learn how to use the Steam Plugin Longbow, Torch and Weeble.
– Create an empty object. Name it LongbowTest. Inside it create another empty object and name it LongbowPickup.
– From Assets/SteamVR/InteractionSystem/Longbow drag and drop the following under LongbowTest:
– Longbow preview – this will be under LongbowPickup
– Torch
– ArcheryWeeble
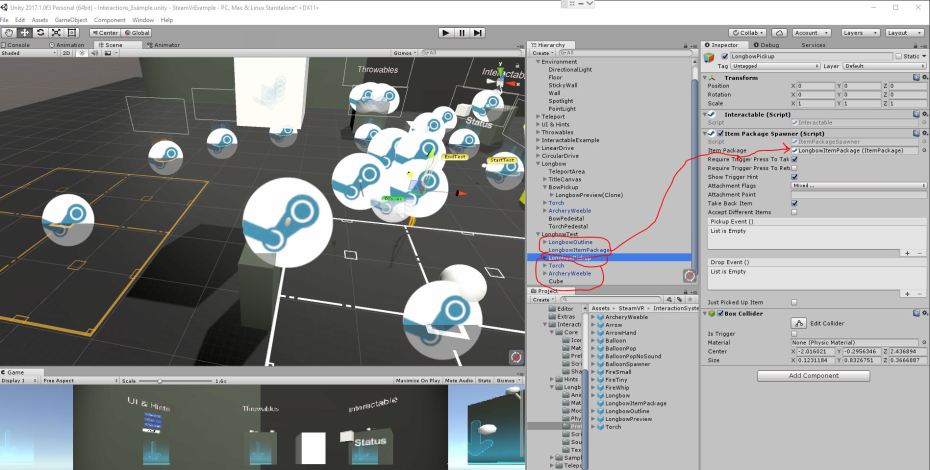
– From Assets/SteamVR/InteractionSystem/Core/Scripts drag and drop Item Package Spawner (Script) on the LongbowPickup. – (The Interactable script should be added by default)
– From Assets/SteamVR/InteractionSystem/Longbow/Prefabs drag and drop LongbowItemPackage in the LongbowPickup -> Inspector -> Item Package Spawner, Item Package parameter. Stay here, and check the following: Require Trigger Press To Take, Show Trigger Hint and Take back Item. (also try playing with Require Trigger Press To Return). The last thing to do here is to create a collider (either box/sphere or whatever).
– You will probably need to configure the LongbowItemPackage (in case the longbow doesn’t work properly). You will need to drag the LongbowOutline and the LongbowItemPackage and, while the Item Package is selected, fill in the properties correctly.
– The last thing I want to do is create objects which can be hit by the arrow and the arrow sticks on it.
– Create a 3D object -> cube -> go in the inspector, and in the Box Collider/Material select ArcheryTargePhysMaterial. Now shoot it!
<a target=_blank href="https://ovreality.files.wordpress.com/2017/10/longbow.jpg"
